


I did not plan on writing a dedicated article on RAW vs JPEG. Why? I thought this ship had sailed long ago and the time of heated debates over which format is better was well into the past. But, what I realized in teaching photography is that this topic is still confusing and unclear for every generation of newcomers who decide to join the exciting and wonderful realm of photography.
Here is my attempt to write the only article you will ever need to understand the difference between RAW and JPEG. Hopefully, you will have a profound Zen experience and move forward with your photography never having to think about the issue again!
First Encounter with RAW
When RAW format became available in modern DSLRs, I did not have a camera that supported it. I had read a few articles about the new format but the advantages of shooting in RAW were not entirely clear. Instead, I was converted into a RAW fanboy by purely empiric experience. I somehow got access to a RAW photo — I do not remember exactly how or from where — and opened it in Photoshop. When I started playing around with the image, I almost had a heart attack from pure excitement.
In Photoshop or any other editing program for that matter, when you start moving the editing sliders for things like Contrast and Saturation, you keep pushing the slider further and further until the image breaks up. This is when you know that you’ve reached the limit and cannot go any further. You need to dial it down.
What I experienced during my first encounter with a RAW image was the latitude of how much further I could push it — by a factor of two or more.
Even without fully understanding how the new format worked, I was already sold. I never looked back. The experience was the principal motivation for me to purchase my first DSLR — a Canon Digital Rebel — that supported RAW format.

RAW vs. JPEG: A Low Tech Explanation
Here is the best explanation of the difference between RAW and JPEG in the most extremely simple terms I have ever found.
Imagine that the RAW image is actually dough and, instead of being a photographer, you are a chef. You add different ingredients to the dough and then place it in the oven to bake. By the end of the process, you have a beautiful cake.
The cake looks and tastes good, but it will always be a cake—you cannot make it into a pie or a dumpling simply because it is a cake. But, if you start again with the dough, you can bake or cook anything you want. The only limit is your creativity and talent.
Hopefully, you can see where I am going with this example.
In photography, the RAW format is the unprocessed, uncooked, raw data collected from the scene by the camera sensor. It does not look appealing but it has enormous potential in what you can achieve with it.
JPEG, on the other hand, is the final product. When you apply a series of edits to your RAW image and are happy with the result, you can save it to your portfolio in JPEG format. That’s it. It looks beautiful but there is no way back.
If you are satisfied with the cooking analogy, you can skip the next section and go directly to practical applications of RAW and JPEG formats in photography.
RAW vs. JPEG: A Technical Explanation
In a nutshell, the digital camera’s processor converts analog light into digital information—ones and zeros—and records it.
The camera sensors consist of tiny units known as pixels. When we read the specifications on a camera, it may say that it has a 20 megapixel sensor, which means that it contains 20 million tiny units or pixels.
When we press the shutter and light hits the sensor, every single pixel measures the intensity of light by counting the number of photons reaching the pixel. The charge of the photons changes the voltage in each pixel; the voltage values are recorded by the camera. That’s it. The RAW data is a collection of recorded voltage values from all 20 million pixels.
But, here comes the biggest challenge when recording color images.
The sensor’s pixels are “color blind.” They can only detect the entire spectrum of light and cannot measure the intensity of separate colors like red, green and blue. If all the pixels only measured and recorded the intensity of the full spectrum, we would end up with only greyscale images.
To overcome this limitation, the designers of traditional color sensors place color filters in front of every pixel. Each filter blocks two out of three colors. As a result, every pixel measures the intensity of one particular color—red, green or blue.
This information is recorded to a RAW file. It contains the information of the light intensity produced by one color from every pixel of the sensor.

JPEG Conversion
When we shoot in JPEG mode, the camera takes the RAW data and runs it through its image processor. It is a complicated and resource-intensive process. First, it tries to estimate or guess the value of the light intensity for two missing colors for each pixel based on the surrounding pixels of other colors.
Next, the image processor applies contrast, saturation and sharpening. It sets the color space and white balance based on the camera settings selected by the user before taking the shot.
In the last step, the JPEG compression is applied and the image is saved to the memory card.

Different JPEGs from Identical RAWs
What it also means is that if two different camera models — Sony and Nikon, for example — use identical sensors and record the same RAW data but use different algorithms to interpret color information, they’ll produce different results. You have probably read reviews where one manufacturer produces JPEGs with much more pleasing colors or more realistic skin tones than another. The reason for this is because each manufacturer uses different approaches to interpret the missing color data.
When we shoot RAW, the voltage information from every pixel is recorded to a file and saved to the camera’s memory card. The process of interpreting color information, applying contrast, saturation, white balance and so forth is done manually by using various RAW processors like Lightroom, Camera RAW, Raw Image, Capture One, etc.
Nondestructive RAW Processing
Now, the concept of “nondestructive RAW processing” should make more sense. When we load a RAW file into Lightroom and start moving the Color Balance slider, for example, we do not change the file. Instead, we only change our interpretation of the data. Since we cannot preview RAW data directly, Lightroom generates a preview for us — a JPEG version of our interpretation — leaving the RAW file untouched.

To summarize the geeky stuff: when we shoot JPEG, we rely on the camera’s processor to interpret the raw data and produce the final photo. The process is based on estimations, averages and algorithms.
When we shoot RAW, we have full control over the developing process and can create multiple variations of the same RAW image. But, it takes skill and experience, and is a much more time-consuming process.
When to Shoot in RAW
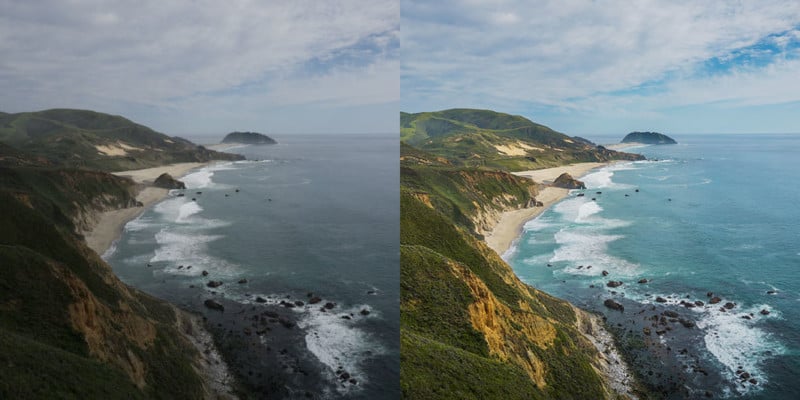
Landscape Photography. When we shoot landscapes, we most often deal with the extended dynamic range of light with the very bright sky and dark shadows. The JPEG format has a “clipped” dynamic range that is inevitable during compression. The use of RAW format for landscapes is paramount.
HDR Photography. Once again, the name of the game is dynamic range. When the dynamic range of the scene exceeds the dynamic range of the camera sensor, the use of HDR is necessary. The HDR technique requires taking multiple images with different exposure values and merging them into an HDR image with an extended dynamic range. Merging JPEG images that were previously compressed and processed is less than ideal.
Large Format Printing. When we shoot with the intent to produce large prints, using the RAW format is necessary. If I have a 24 Mpix digital file (6000x 4000x), it allows me to output 20-inch prints at a 300dpi resolution. If I want to print even larger photos, I need to upscale the original file using special software. JPEG images do not handle upscaling very well and often produce compression artifacts.
Difficult Lighting Conditions. Every camera has white balance controls. Depending on the lighting conditions (sunlight, overcast, artificial light, mixed light coming from natural and artificial sources), you need to adjust the camera’s white balance (WB) setting to produce natural looking photos.
The beauty of RAW is that you can adjust the white balance after the fact without sacrificing the quality. If you are unsure about the lighting conditions, shoot first and adjust the white balance later.
As a Beginner, RAW Can Cover Your Mistakes. RAW files are more forgiving to your mistakes. If you did not get a proper exposure during the shoot, RAW images give you a much better chance of recovering the images during post-processing.
As a Fine Art Photographer. Fine art photographers do not try to capture reality at its natural state. They try to interpret reality through their artistic vision and talent. RAW images allow more freedom and give fine art photographers more control to achieve their vision.
When to Shoot in JPEG

As a Beginner Who Does Not Edit Photos. The algorithms that cameras use to convert RAW images to JPEGs are getting more sophisticated with each new generation. As a result, the quality of JPEG photos straight from the camera are getting better and better. If you are not comfortable with post-processing photos in RAW editors like Lightroom, use JPEGs.
Action Photography. Because JPEG files are much smaller, they allow photographers to shoot at a much faster frame rate and to record images to a memory card faster. For example, if you shoot RAW, you can shoot at 10 frames per second and take a maximum of 100 shots before the camera buffer is filled and you must wait until the images are recorded to the memory card. When shooting JPEGs, you can shoot at 14 frames per second and take 350 frames before the buffer is filled. This is a huge advantage when shooting action sports.
Event Photography. Sometimes during live events, a photographer simply does not have the time to edit photos. The photo is being transferred as soon as it is taken. If the photo is not edited after the capture, there is no need for RAW.
As a Reporter Working for AP or Reuters. It is a new trend among news agencies to require the original photos in JPEG format only. The logic here is to minimize photo manipulation, which is never welcomed by news agencies.
When Space is Limited on Your Memory Card. If your memory card is quickly filling up, it is time to switch to JPEG. It is better to have a lower quality JPEG than nothing at all.
About the author: Viktor Elizarov is a travel photographer based in Montreal, Canada. He’s also the man behind PhotoTraces, a travel photography blog and community of over 60,000 photographers. Visit Tutorials section of his blog for free tutorials and free Lightroom presets. This post was also published here.


")