


")

")


L’articolo è riportato dal sito collegato al link che state leggendo. Clic per collegarsi al sito originale.
Clic to view the source link
Ricoh Theta Z1 is Ricoh’s new flagship 360 camera, which features the first 1-inch sensors for consumer 360 cameras, along with other groundbreaking features. In this hands-on review, I discuss its specifications, features, image quality compared to other 360 cameras, as well as price and availability. I also show some sample photos and videos.
Executive summary (updated: April 29, 2019)
Specifications and comparison with Theta V
Features
Why is sensor size important
Sample PHOTOS (updated: April 20, 2019)
Theta Z1 image quality analysis (updated: April 20, 2019)
Sample VIDEOS; video quality analysis
Spatial audio workflow and sample (added: April 23, 2019)
Low light sample photos and videos (added April 17, 2019)
Theta Z1 Raw DNG Lightroom workflow (updated: April 13, 2019)
FAQ (added May 3, 2019)
Price and availability
Executive Summary
Here is Part 1 of an in-depth look at the Ricoh Theta Z1. In this video, I discuss the Theta Z1’s features for image quality and workflow. Then I compared the Z1 to popular 360 cameras for virtual tours including Insta360 One X and Ricoh Theta V:
Part 2 discusses dynamic range, low light performance, minimum stitching distance, and ISO invariance. I also discuss why those capabilities are important for virtual tours.
Here is a tutorial
Here are photos shot by Naoto Somese. With the Theta Z1 side by side with the Theta V, we can see just how incredibly compact the Theta Z1 is for a camera with not one but two 1-inch sensors.
Ricoh Theta Z1 Specifications and Comparison with Ricoh Theta V
Here are the specifications of the Z1, in comparison to the Theta V. I highlighted improvements in the Z1.
| Ricoh Theta Z1 | Ricoh Theta V | |
| Lens type | Two fisheye lenses 14 elements in 10 groups 2.57mm focal length |
Two fisheye lenses 7 elements in 6 groups |
| Field of view | Fully spherical | Fully spherical |
| Aperture | f/2.1, f/3.5, f/5.6 | f/2.0 |
| Minimum distance | 40cm to infinity | 10cm to infinity |
| Sensors | Two 1-inch BSI-CMOS sensors, 20mp each | Two 1/2.3-inch CMOS sensors, 12mp each |
| Photo resolution | 7296 x 3648 (26.6 mp in DNG Raw) 6720 x 3360 (22.6 mp in JPG) |
5376 x 2688 (14.5mp) |
| Video resolution: | 3840 x 1920 @ 29.97fps 56 mbps bitrate (H.264) | 3840 x 1920 @ 29.97fps 56 mbps bitrate (H.264) |
| Live stream resolution | TBA | 3840 x 1920 @ 29.97fps 120 mbps bitrate |
| ISO (photo) | 80 to 6400 (ISO priority mode) | 64 to 3200 (ISO priority mode) |
| ISO (video) | 80 to 6400 (ISO priority mode) | 64 to 6400 |
| Shutter speed (photo) | 1/25,000 to 60 secs | 1/25,000 to 60 secs |
| Shutter speed (video) | 1/25,000 to 1/30 sec. | 1/25,000 to 1/30 sec. |
| Exposure modes | Aperture priority Auto – Noise reduction – DR compensation – HDR rendering Manual Shutter priority ISO priority |
Auto – Noise reduction – DR compensation – HDR rendering Manual Shutter priority ISO priority |
| Image stabilization | Yes (gyro sensor, accelerometer) | Yes (gyro sensor, accelerometer) |
| Microphone | Spatial audio | Spatial audio Microphone input Spatial mic accessory |
| Waterproof? | No as of Feb. 2019 | Dedicated waterproof case |
| Connectivity | 20mbps (2.4gh) or 50mbps (5ghz) USB Type C 3.0 |
Wi-Fi 20mbps (2.4gh) or 50mbps (5ghz) Micro USB 2.0 |
| Storage | 19 GB internal (around 40 mins. of 4K video, or 2400 photos) | 19 GB internal (around 40 mins. of 4K video, or 4800 photos) |
| Compatibility | Android iOS Windows Mac |
Android iOS Windows Mac |
| Battery | nonremovable Li-ion | nonremovable Li-ion (260 photos or 65 mins. video) |
| Weight | 182 grams | 121 grams |
| Dimensions | 48.2mm x 132.5mm x 29.7mm (24mm) | 45.2mm x 130.6mm x 22.9mm (17.9mm) |
| Price and availability | $999.95 expected April 11, 2019 | $399 launched September 24, 2017 |
Features
1. 1-inch BSI-CMOS sensor (New! First among consumer 360 cameras)
The Theta Z1’s key feature is its large 1-inch sensors, which are around 4.3x larger than the 1/2.3 inch sensors typically used in consumer 360 cameras. The Z1’s sensor is actually more than half the size of a Micro Four Thirds sensor, and as much as 1/3 the size of an APS-C size sensor.
All other factors being equal, larger sensors have higher image quality than smaller sensors: greater bit depth, wider dynamic range, and better low light performance. See below.
2. Compact size; low parallax stitching error
The Theta Z1 is remarkable not only for its large sensors but also for its incredibly compact design, which is barely larger than the Theta V, and indeed thinner than most 360 cameras that have smaller sensors. The relatively small distance between lenses means that it has less parallax stitching error, and with its optical flow stitching, should have smooth stitching.
Ricoh was able to achieve this through a folded optical path. In conventional designs, the sensors are directly behind the lens, which would have made the camera thicker. Instead, the Theta Z1 uses prisms to redirect light. As light enters through its lenses, light is reflected 90 degrees to either side of the camera, where the sensors are. By placing the sensors on the sides of the camera, Ricoh was able to move the lenses closer to each other.
3. Variable aperture (New! First among consumer 360 cameras)
The Z1 has a variable aperture, the first consumer 360 camera to have such a feature. It appears to be a true physically variable aperture, not just a digital ND filter because Ricoh states that the image will be sharper with the smaller apertures. The smaller apertures also enable longer exposures, up to 3 stops longer than the Theta V.
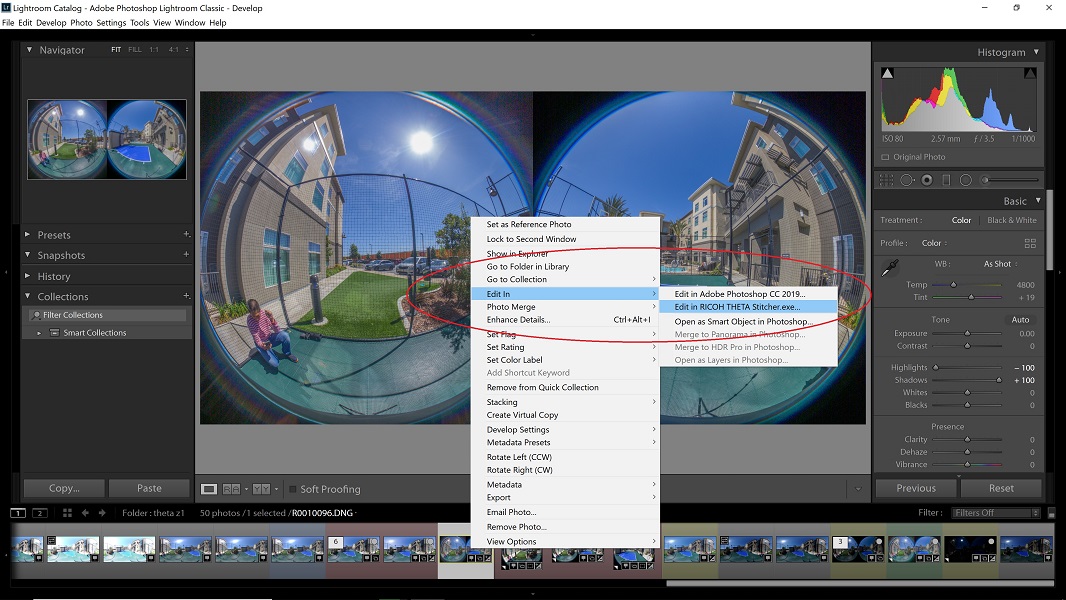
4. Raw DNG mode with Adobe Lightroom stitching (New! First consumer 360 camera with Lightroom stitching)
The Theta Z1 can not only shoot in DNG Raw mode but Ricoh has created a special plug-in for Adobe Lightroom Classic called Ricoh Stitcher, which for the first time will enable users to edit photos in Lightroom and then stitch them on export, with adjustments for zenith, horizon, and stitching distance. See workflow below.
5. Improved lens design (New!)
Ricoh stated that the Theta Z1 has a new lens design to reduce ghosts, flares, and purple fringing. See sample photos and image quality analysis below.
6. OLED display and Fn button (New!)
The Theta Z1 has an OLED display and a new Fn button, which enables the user to switch between normal shooting and self-timer shooting without having to use a smartphone. You’ll also be able to switch between three plug-ins, or turn off the OLED display or mute the Z1. You can also access custom settings (one for still images and one for videos). These controls enable faster shooting with the Z1 compared to previous Thetas.
7. Android plugins; remote playback
Like the Theta V, the Theta Z1 can use Android plugins. It can accommodate up to 3 plugins at any given time, which are accessible through the in-camera menu. Bef default, it includes the remote playback plug-in to enable photos and videos to be played wirelessly on compatible devices, and the USB transfer plugin for transferring data to a USB stick.
8. More durable (New!)
The Theta Z1 has a tougher build quality with a magnesium body and a metal tripod hole, unlike the plastic body and plastic tripod hole of the Theta V.
9. Exposure modes
The Theta Z1 features a new aperture priority mode, and has a multi-bracket shooting with up to 19 photos, with user-customizable exposure settings for each of the bracketed photos. The Z1 also has the same exposure features as the Theta V, including DR compensation, HDR rendering, interval composite for star trails.
10. 4-channel Spatial audio
The Theta Z1 has 4-channel spatial audio. It is able to record both horizontal and vertical direction of sounds. In a 360 video, the sound will change accordingly, depending on which direction the user is viewing, thus increasing the immersiveness of the video. However, unlike the Theta V, the Z1 does not have a microphone input and cannot use the optional TA-1 microphone of the Theta V.
11. GPS and Street View
The Theta Z1 can geotag 360 photos if you take a photo with a GPS-enabled smartphone. The Z1 is compatible with the Street View app, which can be used to control the Z1 to take geotagged photos one at a time, or in intervals. However, as of April 9, 2019, Z1 videos cannot be uploaded to Street View yet.
Why is sensor size important?
All other factors being equal, a camera with a larger sensor will have better image quality. Indeed, sensor size is one of the most important factors for imaqe quality. Sensor size will affect bit depth, dynamic range, signal to noise ratio (low light performance), and other factors.
It is true that the Theta Z1’s resolution is modest at around 23mp. However, you can see in my comparison below that it has more detail than most other 360 cameras, even those that have nominally higher resolution. It also has exceptional dynamic range and shadow recovery (see below).
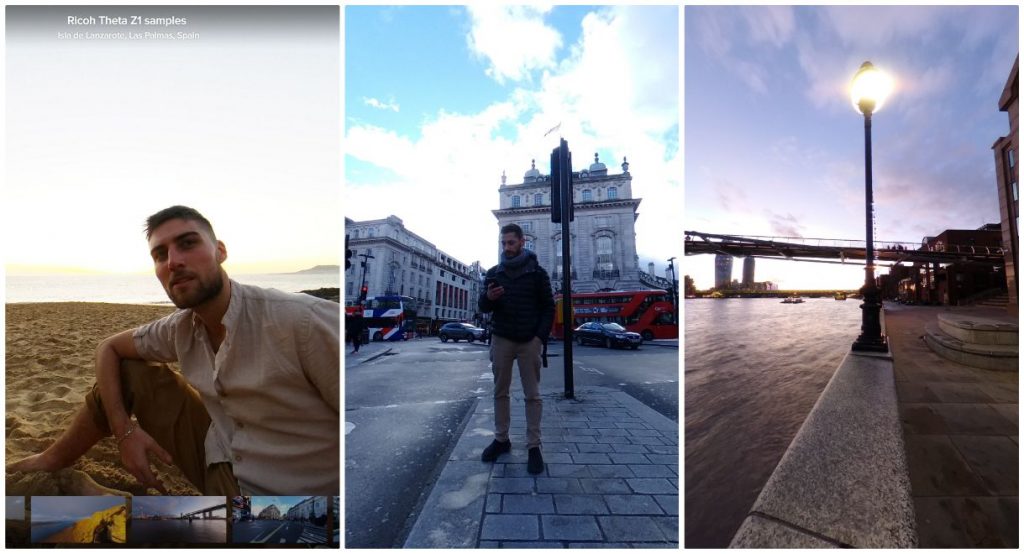
Theta Z1 Sample photos (updated April 19, 2019)
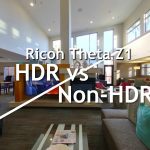
Theta Z1 HDR vs. Non-HDR
For those who prefer not to edit their photos, the Z1 also has an excellent built-in HDR mode hat requires no stitching or HDR fusion. The HDR image is ready to use straight out of the camera. Here are comparisons between Theta Z1’s HDR mode vs non-HDR mode:
Theta Z1 vs. Theta V:
First, here are unedited sample photos comparing the Theta Z1 in HDR mode and non-HDR mode:
Here are similar photos taken with its predecessor Theta V (HDR Mode) for comparison, also unedited straight out of the camera:
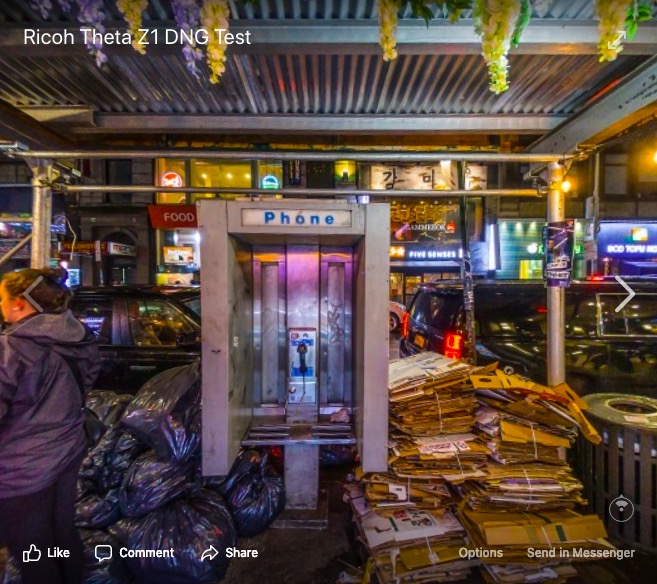
Here is a link to sample photos by Sam Rohn shot it DNG, edited in Lightroom and stitched in PTGui:
Here are official sample photos, with EXIF information (click on the circle with “i” on the bottom right corner).
You can download sample JPG, DNG and Raw files here. You can download the official samples here. Check back for more samples.
Theta Z1 Image Quality
Theta Z1 Resolution
The Theta Z1’s nominal resolution is not impressive at around 24mp. However, for 360 cameras, specifications are seldom an accurate indicator of actual image quality. There are many examples of 360 cameras with lower specifications that outperform 360 cameras with supposedly higher specifications.
Here are comparisons of crops from the photos above.
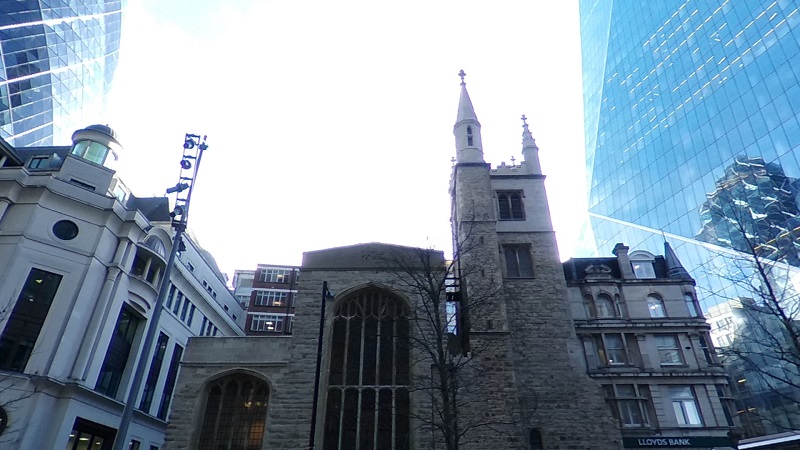
Theta Z1 dynamic range, exposure latitude, shadow recovery
The Theta Z1 has amazing dynamic range, especially its shadow range. It also has exceptional exposure latitude and shadow recovery capabilities:
In the photo above, I underexposed by almost 5 stops to preserve the highlights, and in Lightroom, I pushed the exposure +4.61EV and pulled back the highlights -55. Even without any noise reduction or other edits, the recovered photo looks remarkably clean even with such extreme adjustments (there is chroma noise that can be mitigated in post).
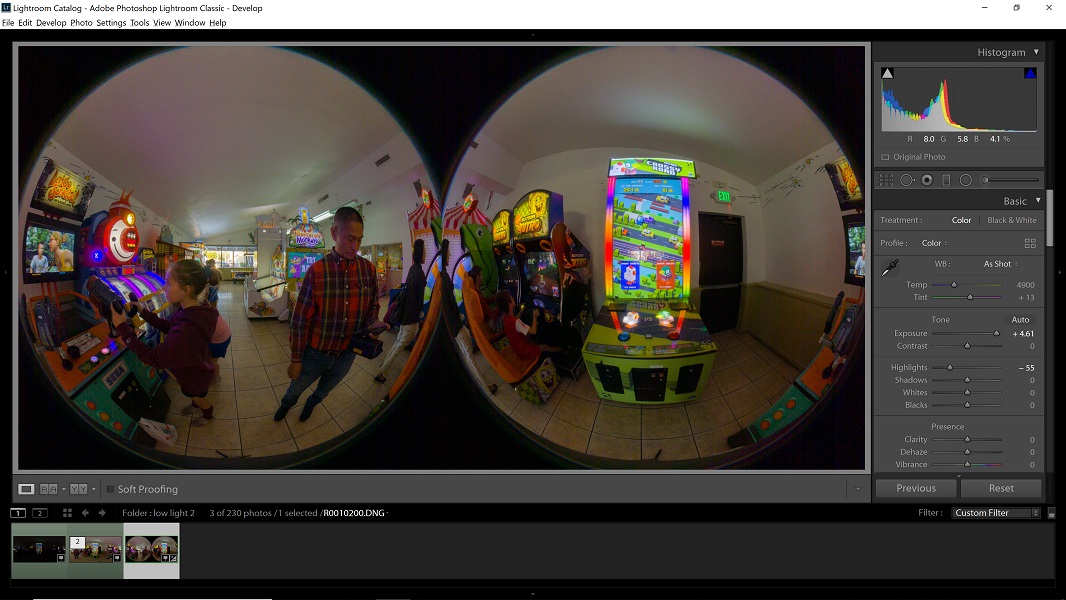
To use the Z1’s shadow range to the fullest, I typically expose for the highlights, and normalized the exposure in postprocessing. The result is HDR-like dynamic range (even including the scene outside the window).
Stitching quality and minimum stitching distance (New!). Due to the Z1’s larger sensors, it has a larger distance between its lenses compared to the Theta V, which means there is greater parallax stitching error. I found that the Z1 is able to stitch automatically until around 3 feet. At closer distances, automatic stitching becomes unreliable. However, if you shoot in Raw DNG format, it is possible to adjust the stitching manually using Ricoh Stitcher. When adjusting the stitching, it is possible to stitch as close as 1 foot.
Flare resistance of the Z1 appears excellent. Many 360 cameras have difficulty dealing with flare, with the side of the camera facing the key light often seemingly “brighter” than the other side (in fact, what viewers are seeing is flare). The Theta Z1 however, seems to have very strong flare resistance. Many of the samples show a bright light source against a dark background, but no flare is visible in any of the photos. Moreover, I saw no evidence of the “red dot flare” that plagued the Z1’s predecessors.
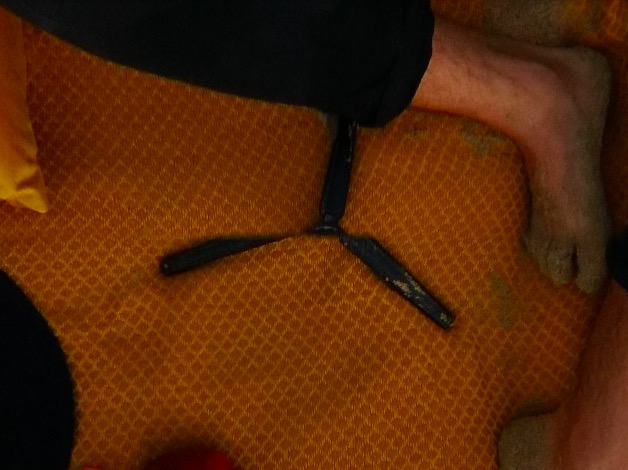
Stitching on these sample photos looks very smooth, and although there is a drop in sharpness very close to the stitch line, it has far better consistency of sharpness compared to the Theta V or previous Thetas which had a noticeable decrease toward the stitch line. In this crop from the beach shot, we can see that the stitching is not only smooth, but that you can see fine details such as the threads on the beach towel, even at the stitch line.
Chromatic aberration: one of the previous Thetas’ weaknesses is chromatic aberration (although it is mitigated to some extent by software). The Z1 still shows some chromatic aberration, but it seems much more controlled than on previous Thetas.
Theta Z1 Sample videos; video quality
Here are sample 360 videos in 4K:
The video quality on the samples seems to be underwhelming. The detail level is noticeably lower compared to 5.7K cameras in 2019. The contrast is also quite high, with very deep shadows. I took test shots in brighter light conditions which did not materially change the appearance of the videos. On the positive side, the videos can be edited to reduce contrast, which reveals a little more detail in shadows. However, see below re its low light video quality.
The stabilization is a bit unusual. If the camera is held vertically, then it appears more stable than the Theta V. However, the camera can exhibit jittery movement, which seems to occur most often when the camera is at an angle (such as a 45 degree angle). I’m hoping Ricoh can fix this issue.
Spatial audio sample and workflow
The Theta Z1 has spatial audio. Here is a sample:
To hear the spatial audio effect, you’ll need earphones. You’ll notice that the sound changes as you rotate the video.
The Z1 uses the same spatial audio workflow as the Theta V. Here is how to use spatial audio:
1. Download and install Theta Movie Converter.
2. Drag the stitched video over the Theta Movie Converter icon. The app will generate a new video file with spatial audio, and with a .mov extension.
3. If you would like to edit the video in Premiere CC 2019, go to Edit… Preferences… Timeline… and under Default Audio Tracks, look for Multichannel Mono Media, and change “Use File” to “Adaptive.” You’ll see that when you import the Theta Z1 .mov file, it will have 4 tracks within 1 audio track.
4. When exporting the Premiere project, make sure that it is in VR, and that audio is set to ambisonic:
– In the video tab of the export dialogue box, check the box for VR, and choose monoscopic 360 horizontal, 180 vertical.
– In the audio tab, use AAC, and under channels, choose 4.0. Then scroll down and check the box for ambisonic.
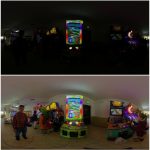
Theta Z1 Low Light Sample Photos and Videos
One of the benefits of a larger sensor is better low light performance. Here are low light sample photos and videos from the Z1. First, here are low light photos:
The photos at base ISO show excellent dynamic range and are able to capture details even in shadows, such as the distant buildings in the background. However, there is some noise in shadows (which can be cleaned in post). Please note the slight banding in the sky is primarily due to re-compression when I uploaded the photos to Kuula.
As I mentioned above, the Z1’s 360 video quality has too low of a resolution to be competitive with other leading 360 cameras in 2019. However, in low light, the Z1’s video quality makes it useful even with lower resolution.
Theta Z1 Raw DNG Workflow (Lightroom or PTGui)
The Theta Z1 can shoot Raw+DNG. The DNG photos are saved as double circular fisheye photos, which can be edited in Lightroom using a Lightroom plugin and a program called Ricoh Stitcher, the first of its kind in the 360 camera industry. Alternatively, the DNG photos can also be stitched in PTGui 11.3 or later.
Lightroom workflow in 3 Steps
The Ricoh Stitcher plugin works with Lightroom Classic CC (not Lightroom CC), and works by using Ricoh Stitcher for roundtrip editing. The benefit of this workflow is that it allows the user greater flexibility in editing the photos in Lightroom and avoids seams in editing. Ordinarily, applying edits such as adjusting highlights, clarity or dehaze will result in a seam between the left edge and right edge of the 360 photo. With this workflow, the stitching is applied after the edits, thus reducing the possibility of a seam in the stitched photo, compared to a photo that is stitched first and then edited afterward.
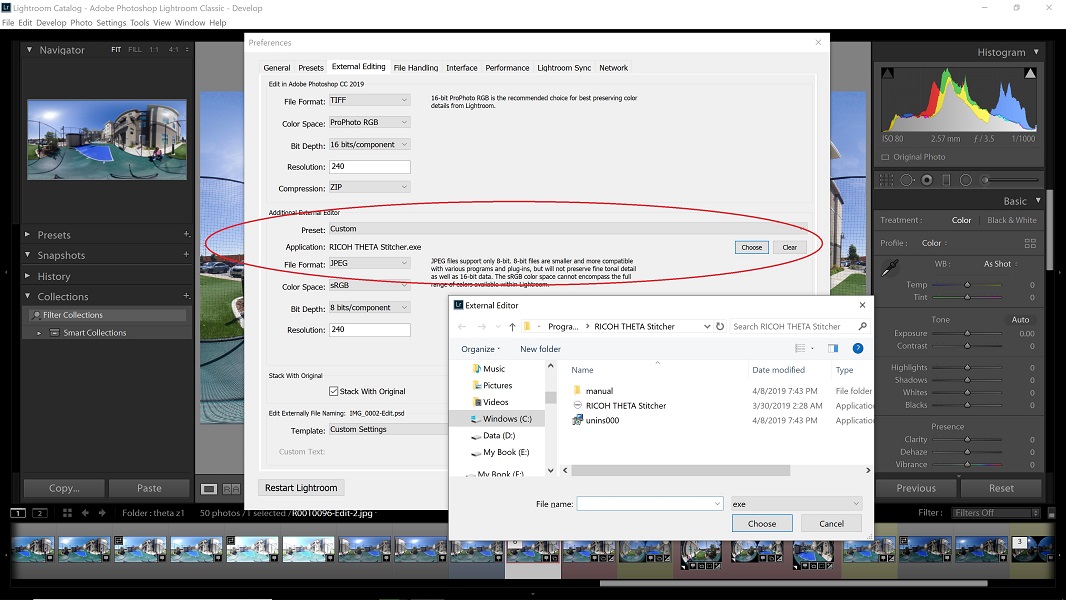
Step 0. Install Ricoh Stitcher
In Lightroom, add Ricoh Stitcher as an external editor by going to Edit… Preferences… and then selecting Ricoh Stitcher.
Step 1: Edit your photo
Edit your photo as normal, with a few restrictions:
– never crop the photo or change the aspect ratio;
– never apply lens distortion corrections. You can however apply lens corrections for fringing;
– if you make a local change to the left edge, you should do it to the right edge as well (because the photo will wrap around).
Step 2: when you’re ready to stitch, launch Ricoh Stitcher
After the file is edited in Lightroom, use the Ricoh Stitcher as an external editor (right click on the photo, select Edit in… and choose Ricoh Stitcher). You can choose to stitch the original file, a copy of the original file, or a copy of the file with Lightroom edits.
Step 3: adjust Ricoh Stitcher settings
When Ricoh Stitcher launches, it will show a low-res equirectangular stitched preview of your DNG photo. You can then adjust the pitch, yaw, or roll to straighten the image. Remember that whatever part of the image is in the middle of the frame will be the ‘front’ of the 360 image, i.e., the first thing that your audience will see when they open the photo in a 360 viewer. You can also adjust the stitching distance from the default. When you save the file, it will be automatically added to your Lightroom library. By default, the photo will be stacked with the original. If you don’t want them stacked, then uncheck the “Stack with Original” checkbox in Step 0.
Here is a video by Naoto Somese showing the Lightroom workflow.
HDR workflow
The Lightroom workflow also adds a new way to make HDR photos. The Theta cameras are all capable of taking bracketed photos. The problem is that each photo is stitched differently, so that if you try to merge them, there will be serious misalignments between the photos.
With the new Lightroom DNG workflow, it is now possible to shoot a manual HDR, with as many photos as you want, using any exposure intervals you want, and be able to stitch them in Lightroom. The Theta Z1 can shoot a Raw+DNG bracket (with seemingly no limit as to number of shots). You can then fuse the unstitched DNG photos within Lightroom using the built-in Photo Merge, and then stitch the merged DNG photo using Ricoh Stitcher.
I have not been able to use the Ricoh Stitcher for photos that have been edited on other programs but you can stitch them on PTGui. For example, I shot a 10-shot Raw+DNG bracket, then combined the DNG photos into an HDR photo using Photomatix HDR. I then imported the HDR photo into Lightroom for editing. From there, I stitched the photo in PTGui.
One drawback is that Lightroom does not have a feature for patching 360 photos (such as to remove objects or to add text). However, Lightroom can do roundtrip editing to Photoshop or Affinity Photo, where a photo can be patched if necessary.
Raw DNG stitching without Lightroom
In addition to Lightroom, it is now also possible to stitch the Z1 DNG Raw photos with PTGui, which added a Z1 stitching template in version 11.3. PTGui supports a variety of imaging formats for import, including TIFF, PNG, Photoshop PSD format, OpenEXR, HDR Radiance, and of course JPG. In addition to supporting more formats than Ricoh Stitcher, I also found that PTGui’s stitched files have a higher nominal resolution, although I haven’t completed my analysis on whether this yields more detail.
FAQ
1. Where is the HDR mode?
From the main screen of the app, tap on the camera icon to launch the live preview. In the preview screen, tap on the bottom right corner to choose the exposure mode and set it to Auto (HDR is available only in Auto mode). Tap on Option Setting and swipe to choose HDR mode. If you do not see the HDR option, tap on the settings on the upper right corner and change the format to JPEG (HDR is not available in Raw + JPEG mode).
2. Can you use Ricoh Stitcher with other cameras?
No.
3. Can Ricoh Stitcher work without Lightroom?
As of now, no. It only works with Lightroom. I’ve recommended to Ricoh to enable it to be used standalone but I don’t know if they will adopt my recommendation.
4. Can the USB Type C port be used for a microphone? Can it be used to connect to storage?
I don’t know yet. I’m testing it. Theta Z1 does run on Android OS so in theory the USB Type C can be used to connect and save files directly to external storage with the right plugin.
5. Can you charge the Theta Z1 with a USB powerbank while using it?
Yes.
6. Where can I download Ricoh Stitcher?
Ricoh Stitcher will be. available for download on theta360.com starting around May 9, 2019.
Price and availability
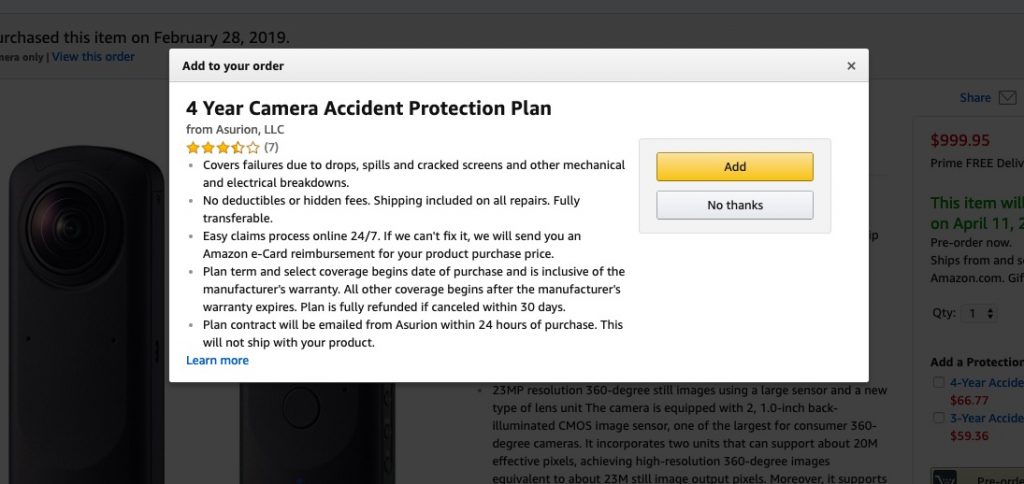
The Theta Z1 is available for $999.95 from Amazon or B&H Photo. It will be available in late May 2019. I believe the Theta Z1 is a very good value at $999.95, given the exceptional image quality. It appears ideal for virtual tour photographers and for photographers who edit their photos. For videos, it is not remarkable and there are several 360 cameras that are more affordable and provide better video quality.
If you’d like to get the Theta Z1, I recommend ordering from Amazon, because you can get a 4-year accident protection plan for just $66.77 with “no deductible or hidden fees,” shipping included on all repairs, fully transferable. However, please note I have no experience dealing with claims with Asurion, LLC. Thanks for using these links to support 360Rumors at no additional cost to you so I can do more tests and reviews.
The post Ricoh Theta Z1 hands-on review, features, FAQ, sample photos and videos (updated May 3, 2019) appeared first on 360 Rumors.


