reported form https://creativecloud.adobe.com/cc/discover/article/low-budget-filmmaking-with-household-objects?locale=it
VIDEO AND MOTION • HOW-TO
Low-budget filmmaking with household objects.
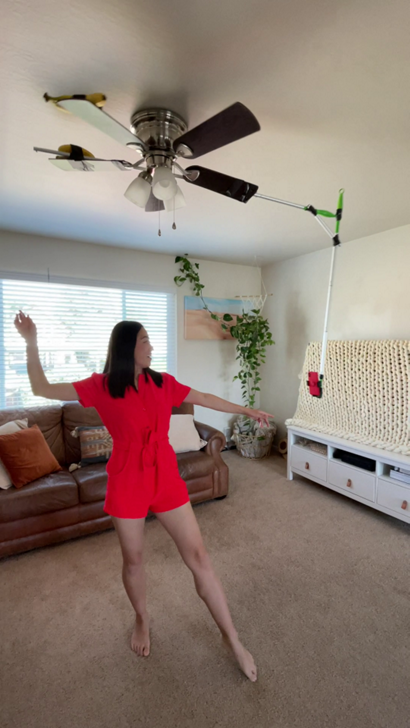
- Ceiling fan.
Recreate the iconic bullet-time shot from The Matrix with a ceiling fan. Safety tip: Do not turn on your ceiling fan. Instead, push it manually for better control.
The setup.
For this shot, I duct taped some Swiffer poles to hang down from a ceiling fan. I also taped some bananas to the opposite side of the fan to add a counterweight.
Camera settings.
For this shot, I used my phone’s 240 FPS slow motion setting.
Editing tips.
Speed ramping really sells the bullet time effect and makes it more dramatic. I used TimeRemap in After Effects in order to speed up and slow down the footage. If you prefer, you can use the Time Remap feature in Premiere Pro.
- Tape measure.
Simulate an elevator going up and down between the rooms of your home by using a tape measure to control lowering the camera.
The setup.
For this shot, I attached my camera to the end of a tape measure, and then had a friend lower the tape measure from the ceiling to the ground. If a third person is available, they can help stabilize the lowering of the tape measure by physically guiding its path downward.
I recommend putting a pillow or blanket on the ground to help protect the camera as it reaches the ground. That pillow also creates a foreground element that helps with the transition between floors.
Camera settings.
The biggest challenge in this shot is the slight side-by-side wobble of the tape measure. Initially, I tried this shot with my iPhone, but the wobble was unacceptable. I got better results with a 360 camera with built-in gyro stabilization. The most popular 360 camera brands are Insta360 and GoPro Max. I’m using an Insta360 ONE X2.
Editing tips.
For the elevator effect, you only need simple match cuts in Premiere Pro — no masking or keyframes are necessary. The foreground element of the pillow acts as a natural physical transition between floors.
- Floss and toilet paper.
I recreated my earlier zipline fake drone shot with objects around the house. I shot the original with a screw mount and fishing wire. This time, I used floss and a toilet paper roll.
The setup.
For this shot, I taped a camera to a toilet paper roll and threaded dental floss through the roll.
I wasn’t sure floss could hold the camera, but it turns out that floss is pretty strong. However, I recommend testing your shot with a similarly weighted item before you attach your precious camera to the DIY rig.
I was also unsure whether the friction caused by the toilet paper roll cardboard would be a problem. In my zipline fake drone shot, the camera sped down the zipline. In this version, the extra friction actually helped to slow down the shot and give me more control.
Camera settings.
You’ll get the best results with a lightweight camera that has significant built-in optical and gyro stabilization. Without stabilization, your shot will be extremely shaky. It’s also helpful to use a 360 camera so you can reframe in post and get better control of the angle. I use an Insta360 ONE R in this shot.
Editing tips.
I used Motion Track in After Effects to further stabilize the shot and keep me centered in the frame as the camera moved toward me.
- Swiffer.
When I was looking around the house for objects that could help me film, I realized that a Swiffer is an amazing camera accessory because its swivel head is perfect for all sorts of dynamic moving shots.
This video is not sponsored by Swiffer, by the way. 🙂
Basic camera sweep.
Tape your phone to the end of a Swiffer. (For easier access, remove the handle.) Swing it from the ground to create this shot to show off the different rooms of your house. You can also place a pillow on the ground right in front of the phone, which acts as a foreground element to help smooth your transitions.
The edit is a simple match cut between the different shots — there’s no need for masking. However, we did add a speed ramp using After Effects’ Time Remap to smooth the transitions. Here, we slowed down at the peak of each shot and sped up on the transitions.
Extra-long Swiffer.
One of my favorite features of the Swiffer is that they’re modular — it’s easy to break apart and re-assemble segments, and to chain together as many as you want. (The modularity also makes the Swiffer portable, a handy trait for film gear.)
I attached an Insta360 camera (specifically, an Insta360 ONE X2) to the end of the extra-long Swiffer for this shot. Shooting with a 360 camera lets you get maximum field of view and to reframe after in post. I also tried this shot with my iPhone, and though it did work, the field of view was much more narrow, so it didn’t look as good.
In the footage, you could see the cameraman holding the stick along the bottom of the picture. To remove him, we used After Effects’ Content-Aware Fill, drawing the mask frame by frame.
Swiffering with friends.
This shot is my favorite. Build a custom rig by attaching one extra-long Swiffer pole to two other Swiffers on both sides and taping a camera to the center of the rig. Enlist two people to swing the pole from one side of the floor to the other.
Although this shot does work with minimal editing, we chose to bring the clip into After Effects to stabilize it. We used the motion tracker to keep the subject centered in frame.


