

My name is Paul Bruins and I am hopelessly addicted to panoramas. It has now been 48 hours since my last fix. If I don’t shoot up at least one fresh panorama per week, I start to experience severe withdrawal symptoms.
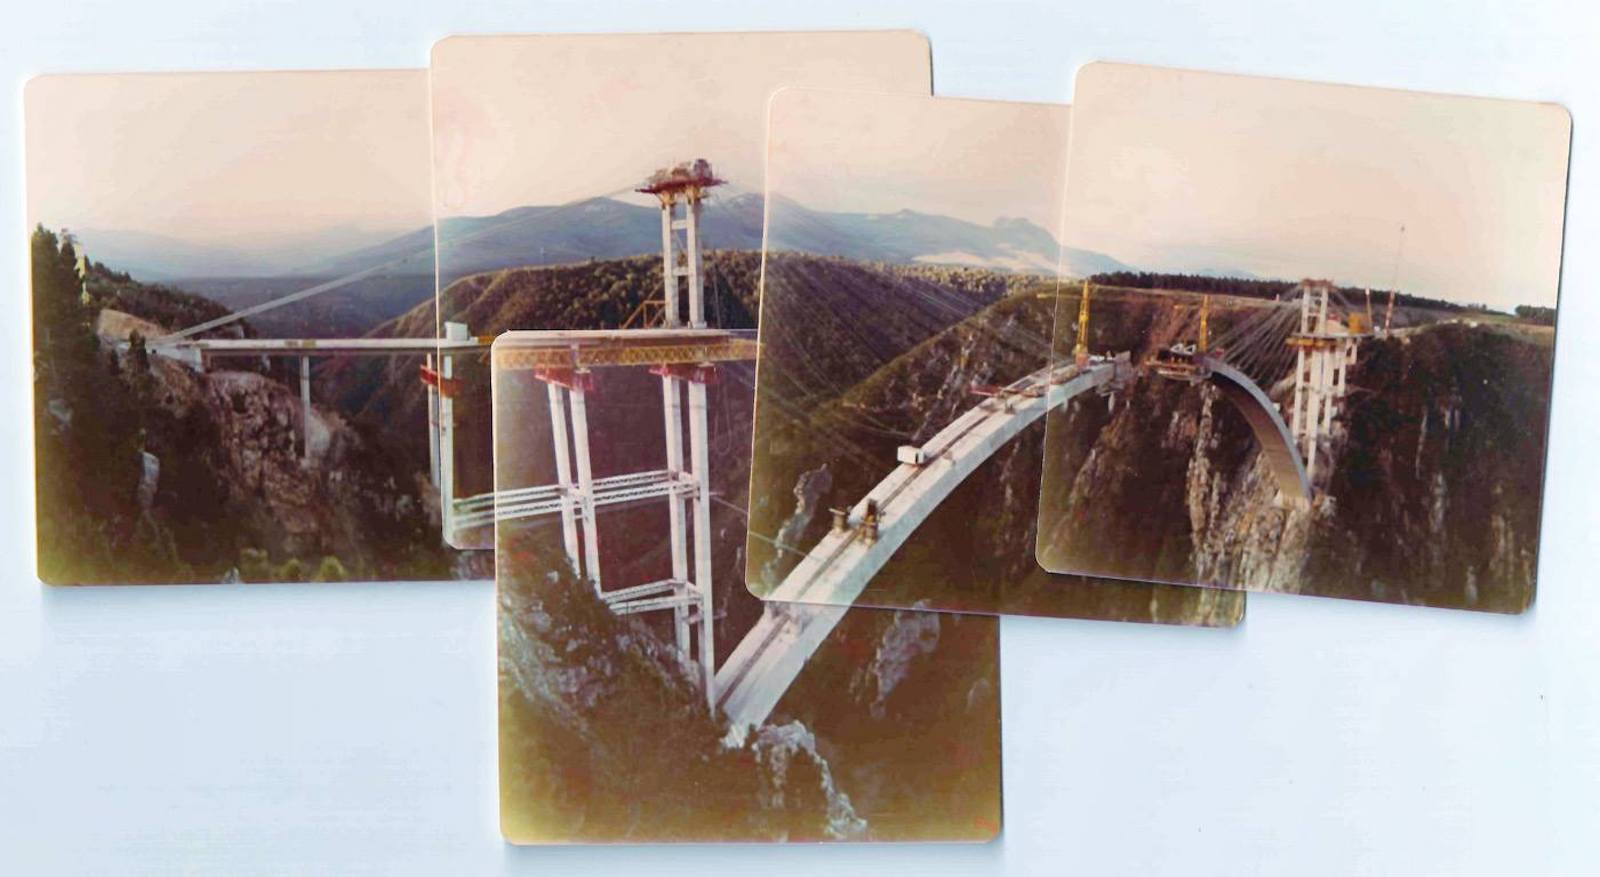
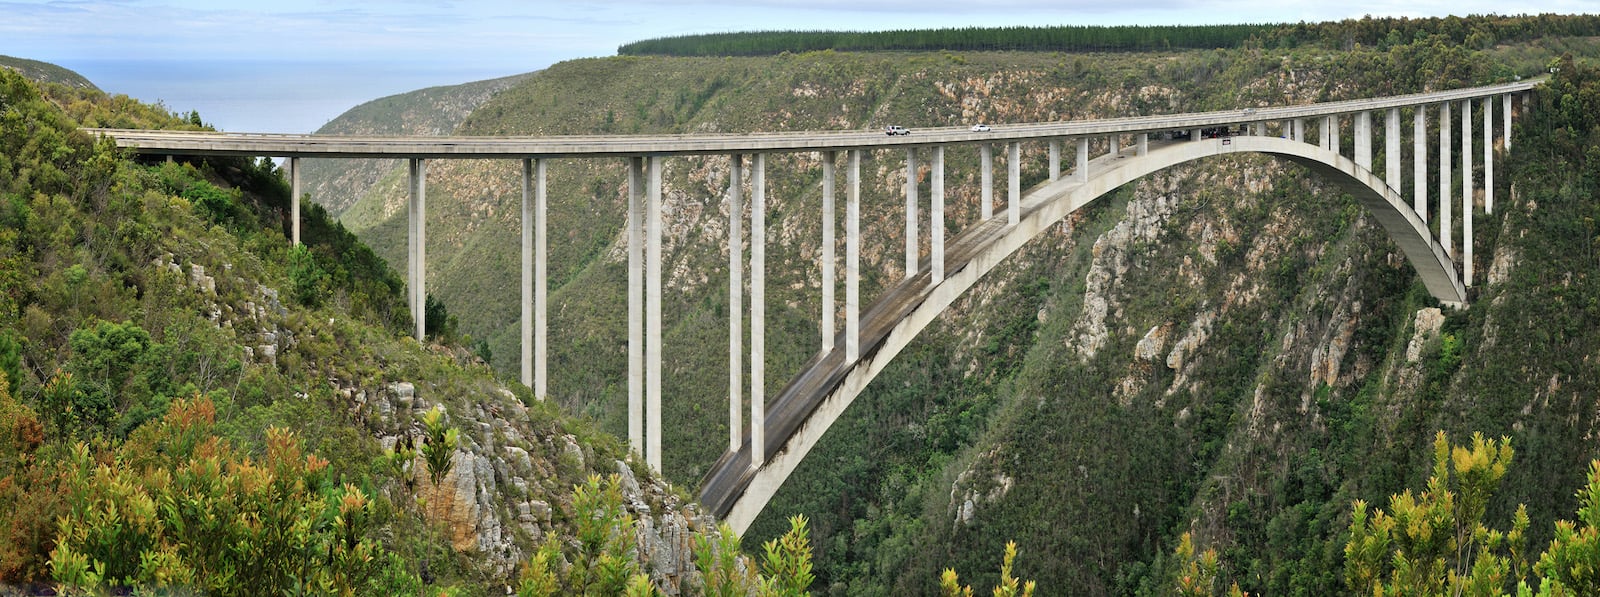
I shot my first multi-image panorama way back in 1982, with a small instamatic camera. It was a panorama of the “Bloukrans” bridge under construction, which was too large to fit into the tiny viewfinder of my camera, and thus required multiple photos to capture in its entirety.
After clumsily sticking the prints together with scotch-tape I was instantly hooked on the concept of multi-image panoramas.
Sticking together glossy paper prints was clearly not the most successful way of doing things, but this was in the early days before digital photography (and stitching software), so I didn’t really have any other option.
Some years later, when digital camera technology became readily available (and affordable) I was one of the first in my circle of friends to make the switch from film to digital. My first digital camera was a measly 2.1-megapixel Sony Cybershot, with terrible image quality when compared to 35 mm film. But that didn’t matter to me, because if I took 10 photos of something and stitched them together, I could easily end up with a 15 megapixel image.
The more I zoomed in to my subject, the more photos I needed to capture it and the larger (better quality) my final stitched image would be.
Besides the improved image quality, the biggest benefit of shooting multi-image panoramas is the freedom of composition and lens-choice that you get when you aren’t always trying to squeeze all the beauty of the landscape into one frame.
When you’re shooting single-frame images, your choice of lens is entirely determined by how close you are to your subject and how much of your subject you are trying to capture—if you want to capture a lot of stuff close to you, then you stick on your ultra-wide lens; if your subject is far away, then you mount your telephoto and zoom in on it. But what do you do if your subject is both far and wide?
If you zoom out a little to capture the wideness of the subject, then the top and bottom of your photo often becomes a lot less interesting than the rest. Why not simply zoom in until your subject fills the frame, and then take multiple images to capture the entire width of your subject? More importantly… why should we EVER allow our compositions to be constrained by our lenses and viewfinders, when most modern stitching software is able to join multiple images together so seamlessly?
However, when digital cameras first became available, our stitching software options were limited to one or two programs, none of which did a very good job of it. Of course, the fact that I didn’t have a clue what parallax was, and how important it was to always rotate your camera around the centre of the lens (the nodal point)… well, that didn’t really help things either. Some of my early panos were impossible for any software to stitch seamlessly, and I often ended up spending hours in Photoshop afterwards, desperately trying to hide all the most obvious stitching errors with the clone brush.
Fast-forward about 6 years, several camera-upgrades, two dedicated panoramic tripod-heads, huge leaps forward in the stitching-software-department, and hundreds of practice attempts later… finally my panos were turning out seamless and flawless.
Finally I felt totally free to capture any subject, confident that my camera and lens would capture all the details, and that the stitching software would be able to put everything together afterwards.
But who was I kidding? I wasn’t totally free at all!
There was one kind of subject that I was never able to capture as a multiple-image panorama, and that was any subject that included multiple moving objects. Since each successive photo in a pano-sequence is taken a second (or more) after the previous photo in the sequence, the moving objects will be in a different place in each photo, which tends to completely confuse the stitching software.
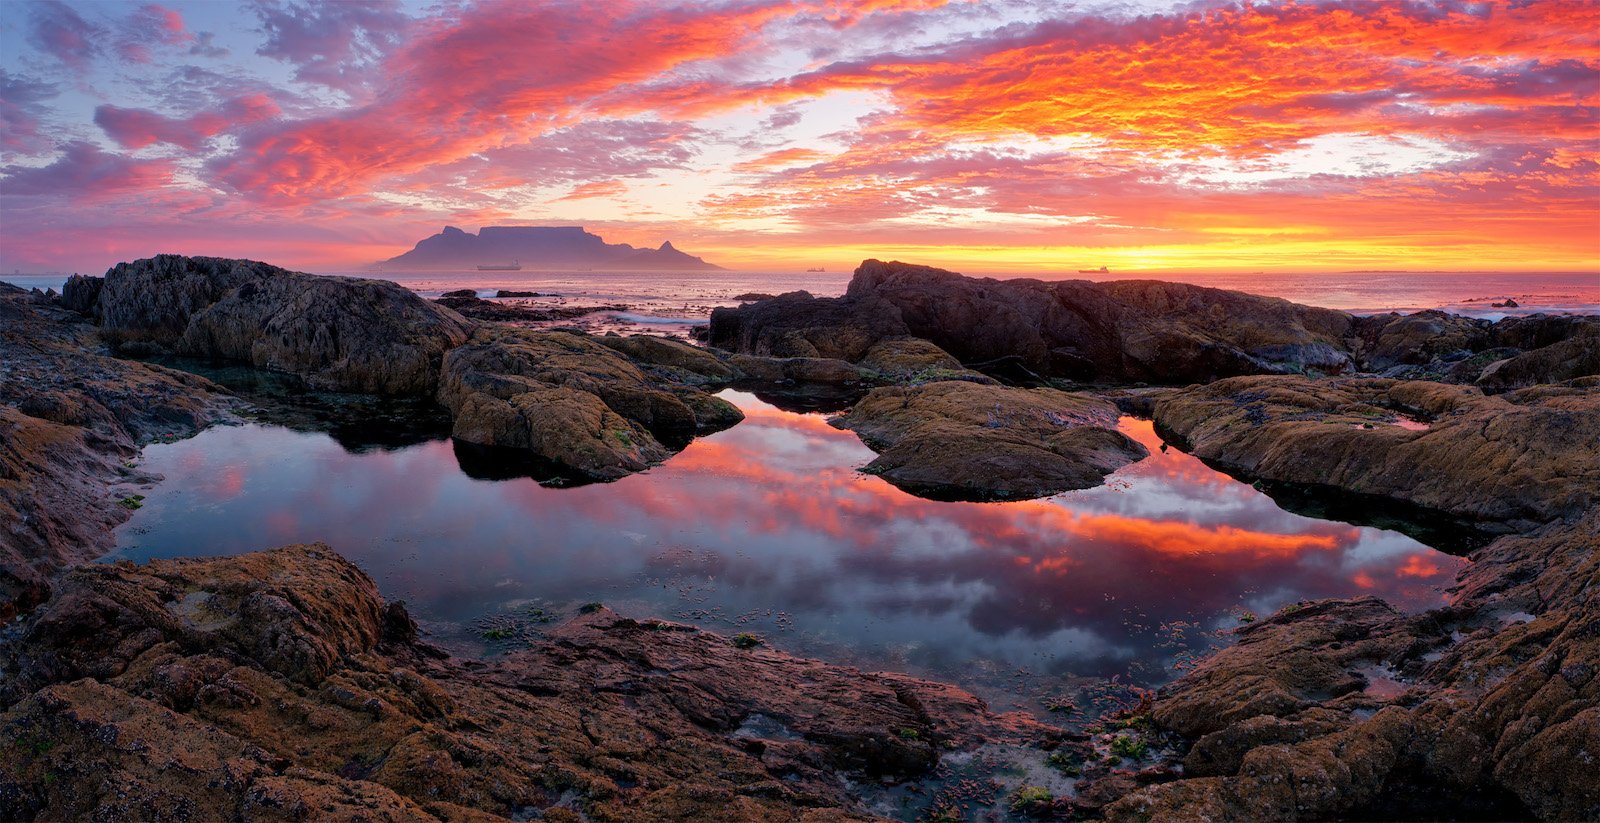
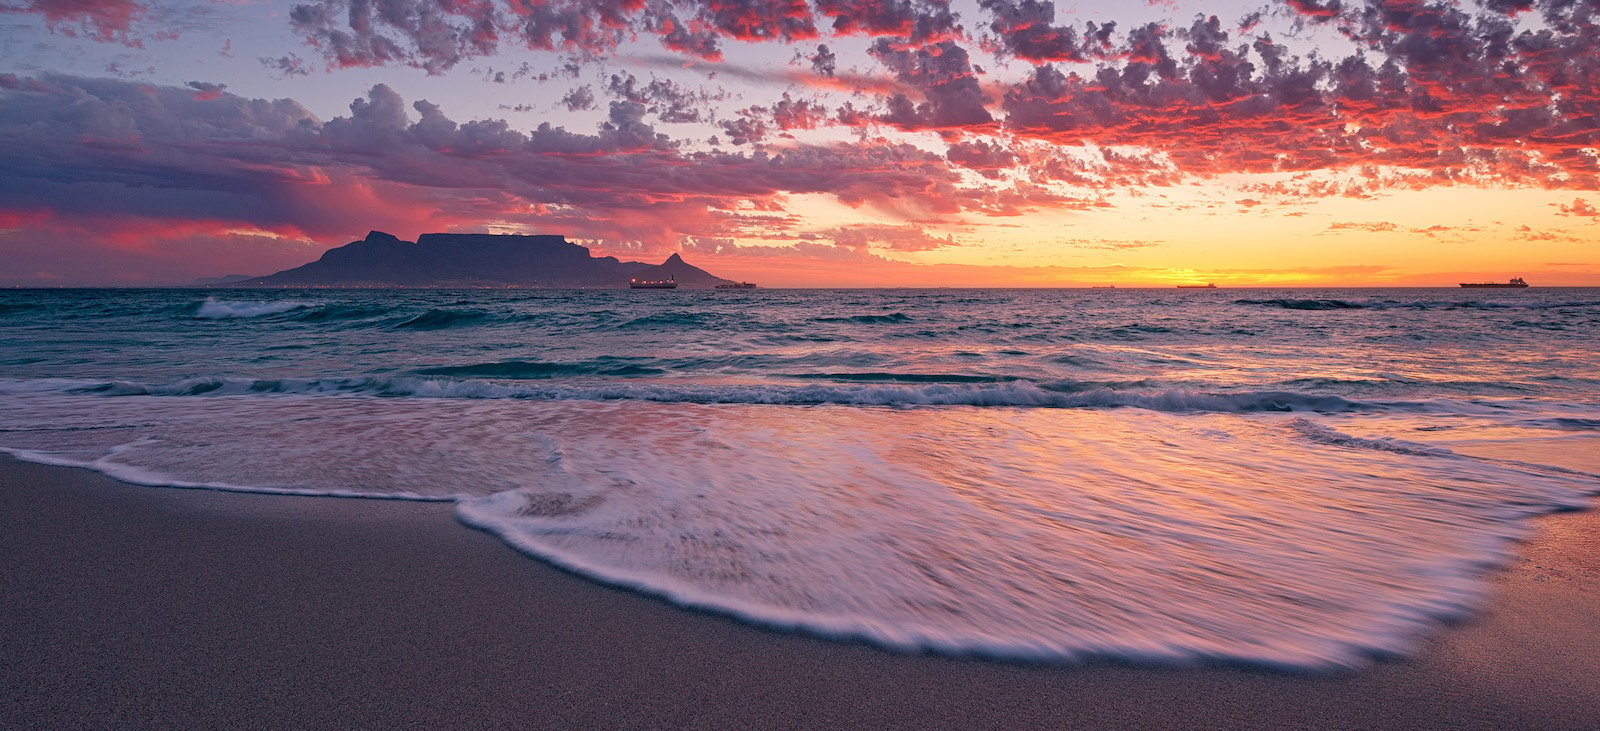
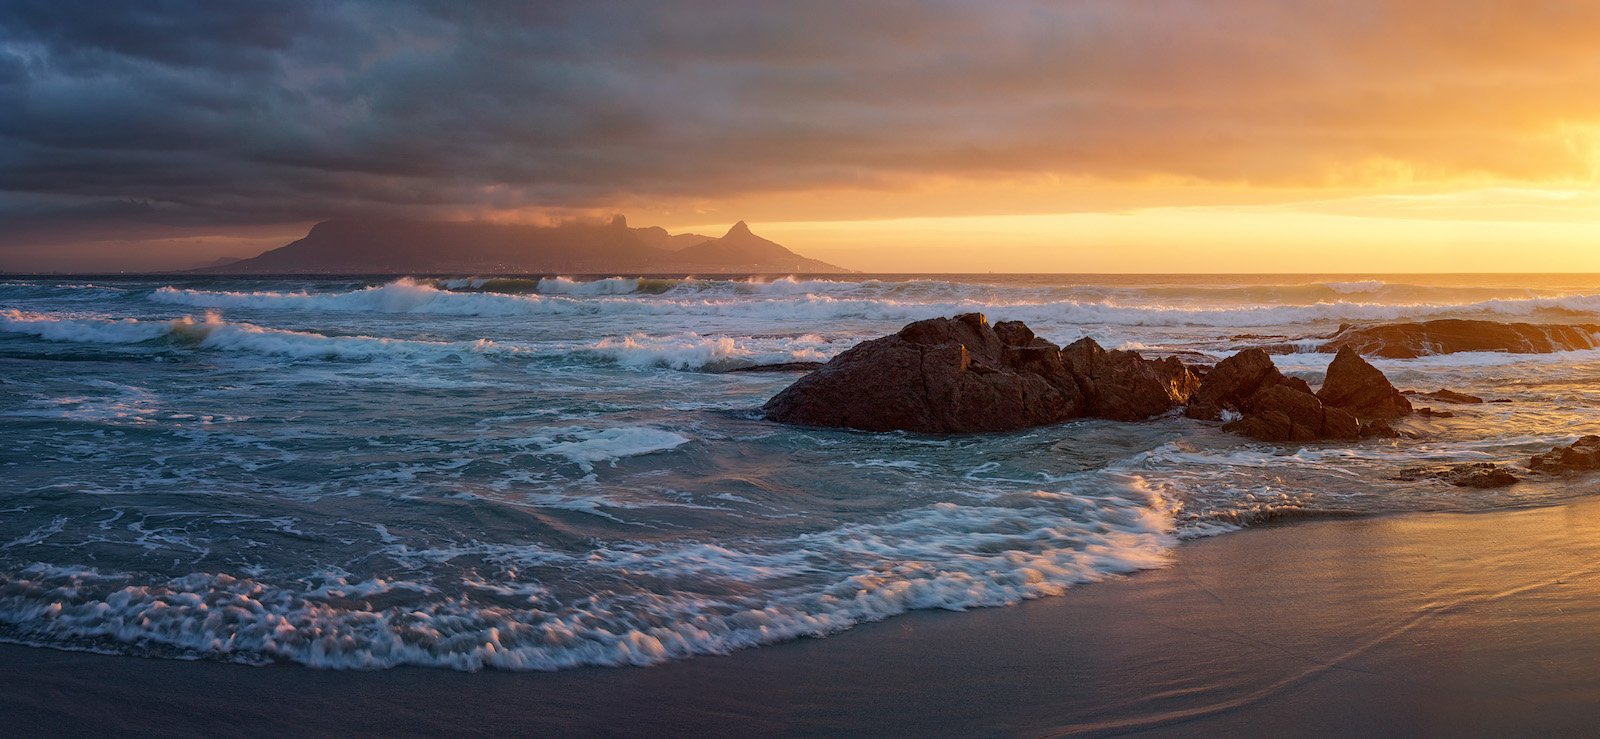
I used all the tricks in the book when I did have one or two moving objects in my composition, but try as I liked, some subjects were simply impossible to capture… including my most favorite subject of all time: Table Mountain as seen from Blaauwberg beach (too many moving waves).
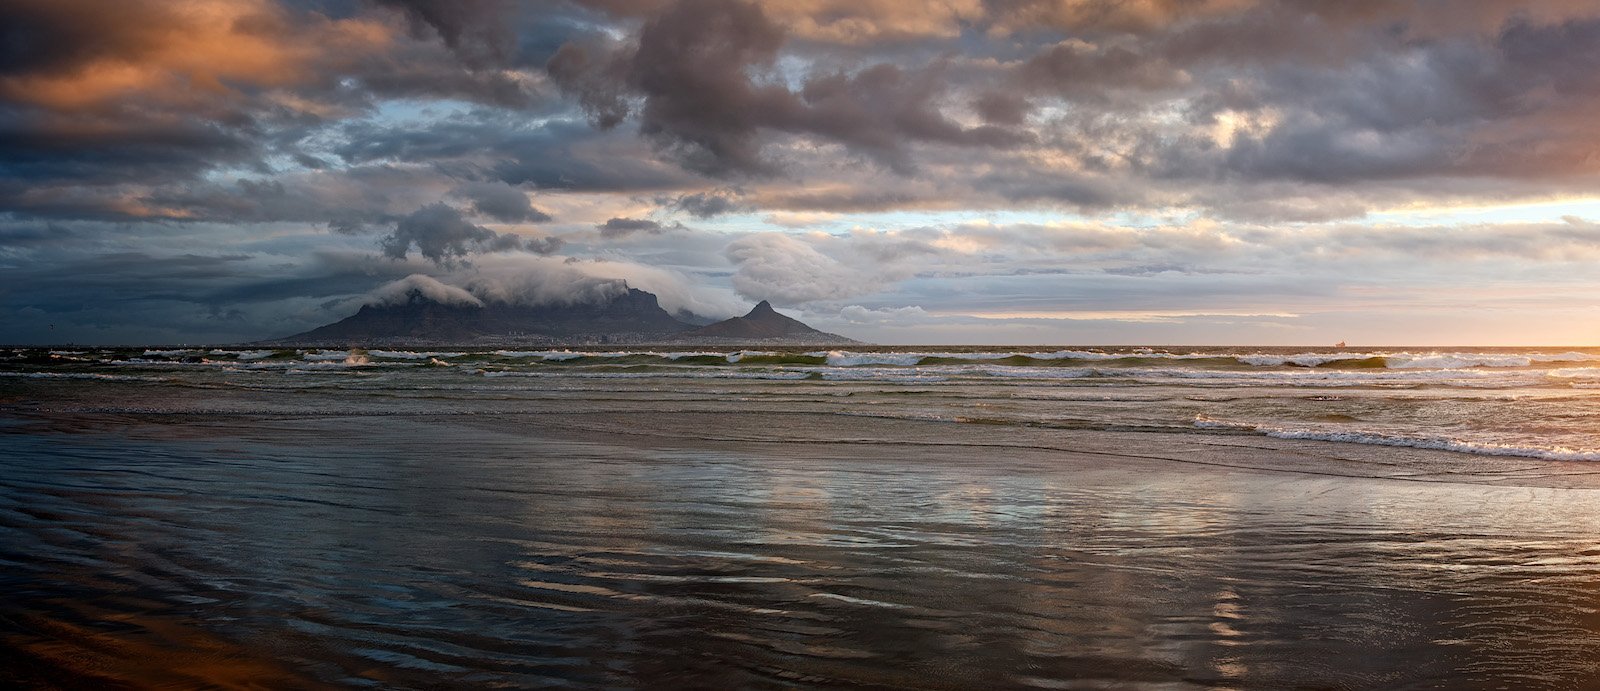
My addiction to panoramas and my love for Table Mountain soon led me to begin adopting a most unsuccessful compromise, the “Croporama.” This is where you crop off the top and bottom part of your photo so that it looks like it could be a panorama. This should probably be called a Fake-orama, since it shares absolutely no similarity with a true panorama, other than the aspect ratio. While shooting Croporamas, our compositions continue to remain constrained by our lens choice. Also, the cropped image will obviously always be smaller than the original single-frame image, and thus always of a lower quality.
The photo below might look like a panorama, but it’s definitely not. This is not what Table Mountain looks like from Blaauwberg beach. It looks much bigger than this in reality. It is my use of an ultra-wide lens that has made it recede into the distance, to appear much smaller than it really is.
This “moving objects” conundrum seemed like a show-stopper to me, something that I would never be able to overcome. Unless I built some kind of tripod-head that could support multiple cameras… to capture all the images required for a panorama at exactly the same time!
At first the idea seemed too ludicrous to even contemplate. How would a thing like that even work? How would I get all the cameras’ shutters to fire at exactly the same time? How would I be able to ensure that the exposure from each camera was exactly the same? And more importantly, how would I be able to eliminate those dreaded parallax errors with the cameras spread out next to each other?
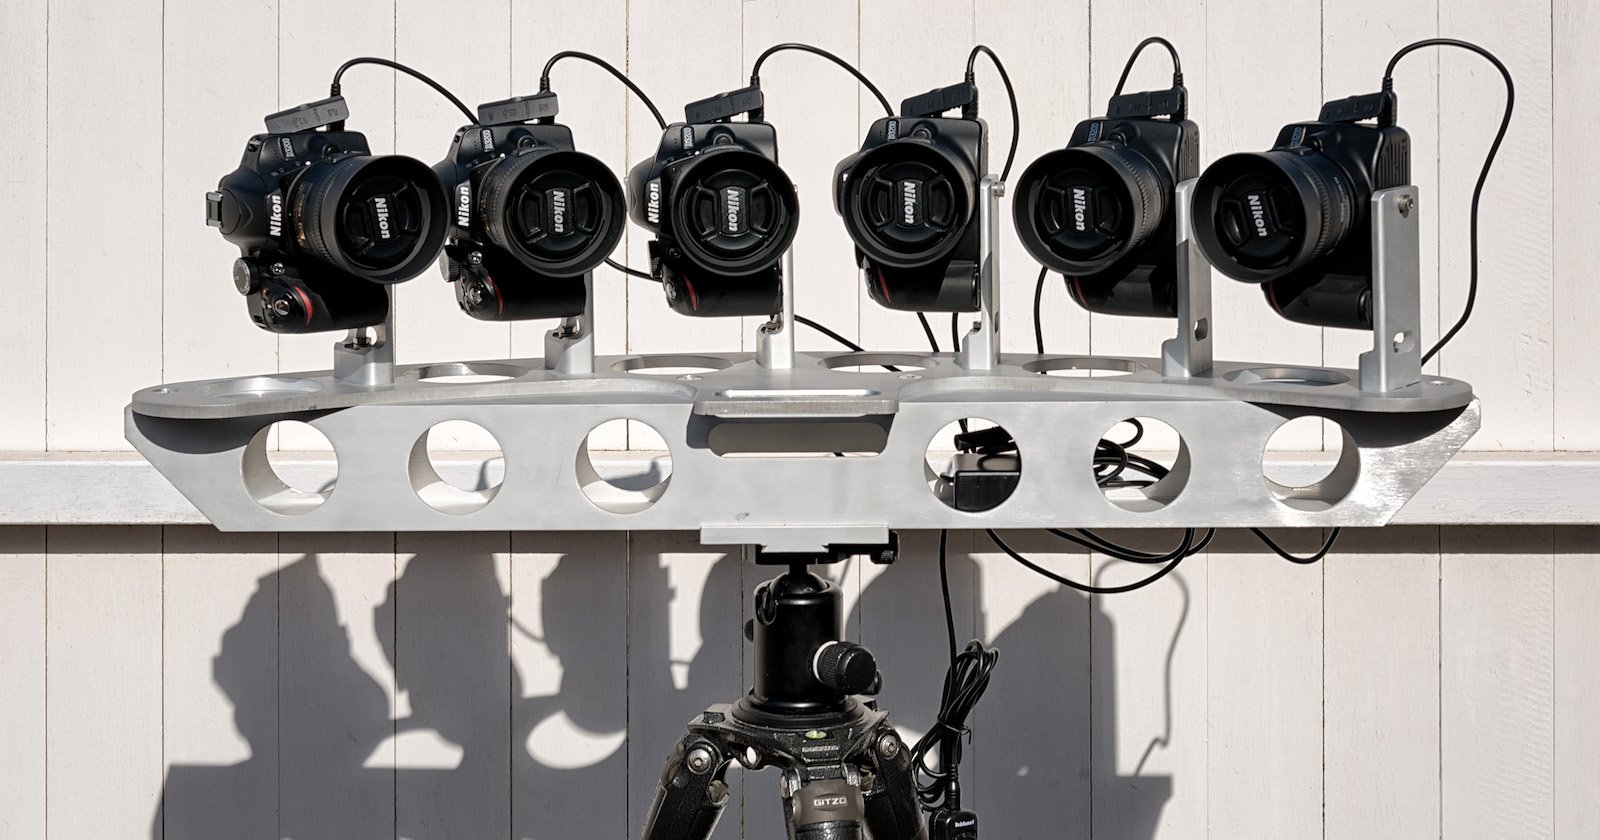
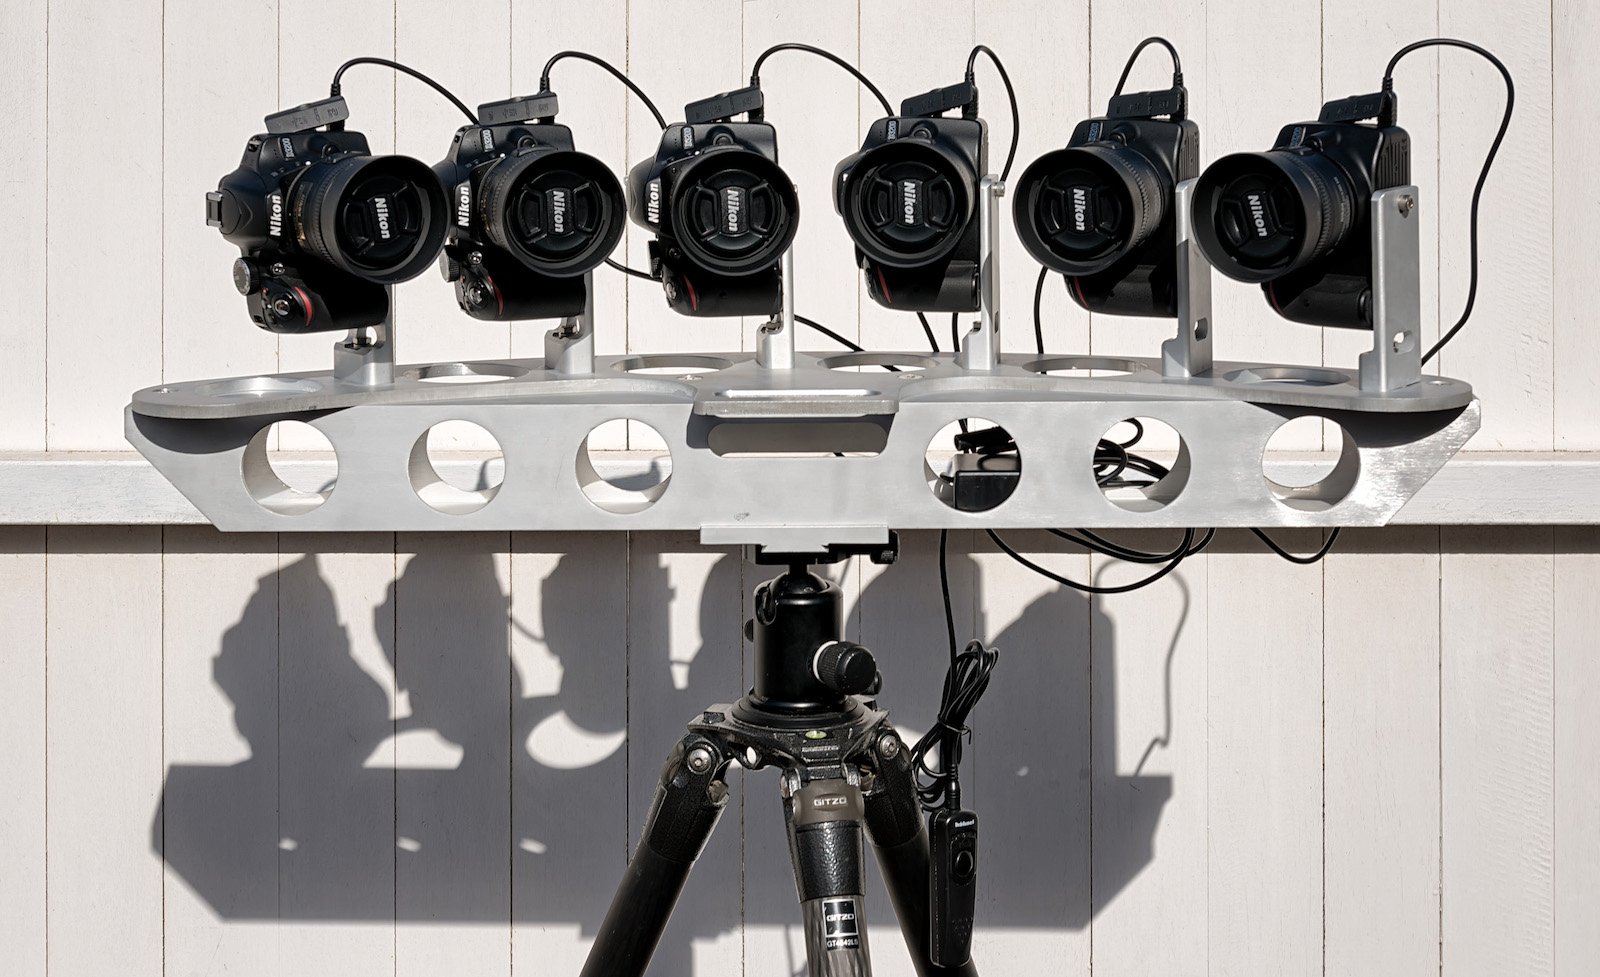
After many discussions (and paper-napkin-sketches) with friends, I decided to attempt the project. To build a rig that could fit onto a standard Arca-Swiss tripod mount, which could be light yet strong enough to support six DSLRs. As much as I would have loved to attach six Nikon D810 cameras to my rig, that would have been both too heavy and completely unaffordable, so I put that idea out of my head as soon as it entered.
I would have to settle for something much less, an entry-level camera, the one with the best image-quality for my buck. I didn’t have to look very far (or long), the superb (24 Megapixel) Nikon D3200 seemed like the obvious choice. I was able to find six “as new” second-hand camera bodies for about half the price of a second-hand D810 body, which was well within my budget.
The next consideration and decision was which lenses to buy. The most versatile lenses are, without a doubt, zoom lenses. But a good zoom lens is usually much more expensive than a good prime lens, which made it very tempting for me to go with the Nikkor 35 mm f/1.8 prime (cheap yet very good). The zoom lens vs. prime lens decision was made considerably easier with the knowledge that with a zoom lens I would have to adjust the angle for each camera every time I adjusted the focal length (to ensure a consistent overlap of the images). That seemed more trouble than it was worth, so version 1.0 of my pano-rig would definitely be using fixed-focal-length lenses!
The shutter-release system proved to be easier to build than I’d imagined. An electronic-genius-friend of mine simply connected six shutter-release cables together into one (inside a small weather-sealed box), with a single wire coming out the other side of the box to connect to the trigger mechanism. Once I’d connected all the cables to the cameras, I was able to auto-focus all the cameras with a half-press of the trigger, and to fire all the shutters with a full press.
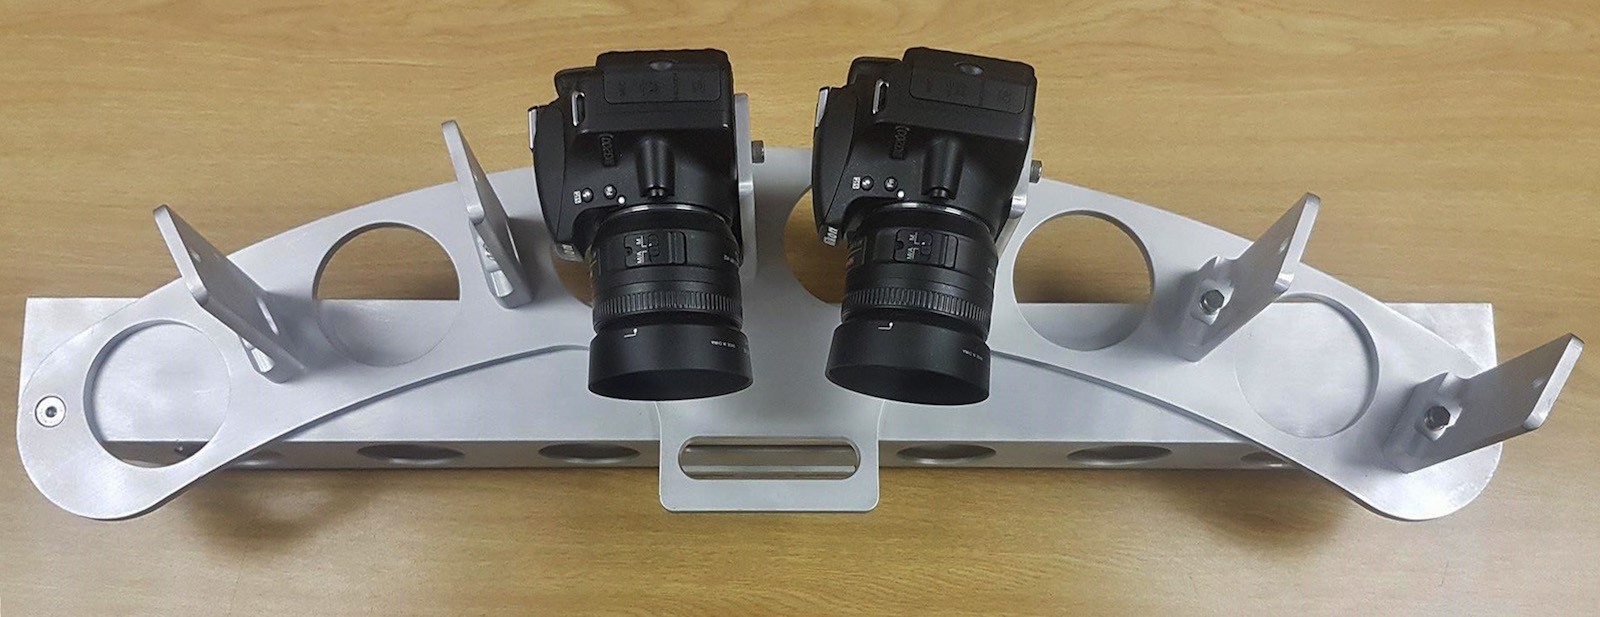
All that remained was to build the rig to hold everything together. The most obvious (and easiest) design seemed to be to mount each camera in portrait format in a straight line next to each other, as close together as possible, yet still allowing some space between to operate each camera. It made sense to spread the direction that each camera would be pointing in a fan-shape, with the left-most camera capturing the left-most image in the pano-sequence.
But the words “Parallax Error” were booming loudly through my head the entire time that I was considering this potential solution. To completely eliminate parallax error I would have to mount each camera vertically above the other, so that the nodal points of each lens would all be on the same vertical plane.
But while the vertical option seemed ideal and preferable to the horizontal option (from a parallax point of view), I was concerned that this solution would also require the longest (and most-fiddly) setup-time before shooting, since each camera would have to be pointing a bit more downwards than its lower neighbour (or aiming more upwards than the camera above it). The more I considered this arrangement, the less the idea appealed to me.
After considering a number of other options (and many, many more napkin-sketches later), I finally settled on the “Banana Arrangement”. This is where all the cameras are mounted in a semi-circular formation pointing inward, so that the left-most camera takes the right-most photo of the pano-sequence. While this cross-over arrangement would probably not completely eliminate parallax errors, I figured that it would reduce them to an acceptable level. As long as I didn’t include too many objects in the immediate foreground of my compositions, the parallax errors would be negligible.
No matter how much brain-power I threw into this design, I was unable how to mathematically calculate what the ideal radius of my banana would be, and the ideal spacing between the cameras.
When in doubt, prototype!
So I bought a short length of steel cable-channel, some steel L-brackets and a bunch of nuts and bolts, and I started playing. I attached the cameras to the L-brackets, and bolted those onto the cable-channel in all conceivable arrangements. As I’d suspected, the banana arrangement proved to be the ideal arrangement, with all the cameras pointing inwards instead of outwards. The biggest downside to this arrangement would be the mental gymnastics that I would have to go through while trying to compose my panoramas (since the left-most camera takes the right- most photo).
The cable-channel proved to be much too flimsy to support the six cameras, and its weight combined with the weight of the L-brackets meant that my first prototype was completely impractical. And since I was (unfortunately) born with two left thumbs, I would need to find someone else (more practical than me) to manufacture the rig to be much lighter (aluminium?), and much more rigid (to eliminate all vibrations).
Fortunately I also have a mechanical-engineering-genius-friend whom I was able to turn to in an attempt to solve the weight and rigidity issues. So I paid him a visit (with prototype in hand) and asked his opinion on how the rig could best be constructed. After a couple of hours of brainstorming (and many more paper-napkin-sketches later), we finally hit on the idea to mount the banana on top of a length of square aluminium tubing (for maximum rigidity), and to drill the whole thing full of holes (for minimum weight).
My Gitzo tripod has a maximum load capacity of 25 kg, but my Kirk ball-head can only manage 6.5 kg. Nikon D3200 camera bodies weigh 455 grams each, and the 35 mm prime lenses each weigh 305 grams. Six of each will add up to just over 4.5 kg, which meant that (unless I wanted to upgrade my ball-head) we would have to ensure that the rig would not be heavier than 2.0 kilograms. The solution was to construct the vertical camera-mounts and the banana- shape from an 8 mm aluminium plate, then use a 4 mm square box tube underneath to stabilize everything… and then drill the whole thing full of holes!
Besides adding rigidity, the box-tube also allowed us to control the balance of the rig on the tripod once the cameras were fitted. Before we bolted it all down, we were able to slide the banana-plate forward and backwards on the box- tube to establish the ideal position to ensure optimal balance. I will admit that the centred (and perfectly balanced) carrying handle was not my idea, but I am ever so thankful for it, as this rig would be very awkward to carry without it.
So after 6 months of planning and scheming, buying cameras and lenses, and building the aluminium rig, I was finally ready to attempt my first multi-camera panorama. If only the weather would cooperate!
But we were in the middle of another typical Cape Town summer, with hazy (smoke filled) skies, daily gale-force winds, and not a wisp of a cloud to be seen anywhere! The first opportunity to test the rig came a full week after it was completed. Of course I did shoot a couple of “proof of concept” panos in my garden while I was waiting for the weather conditions to improve, but as soon as the air cleared a little and the wind died down to a stiff breeze, I was out on the beach to test my contraption.
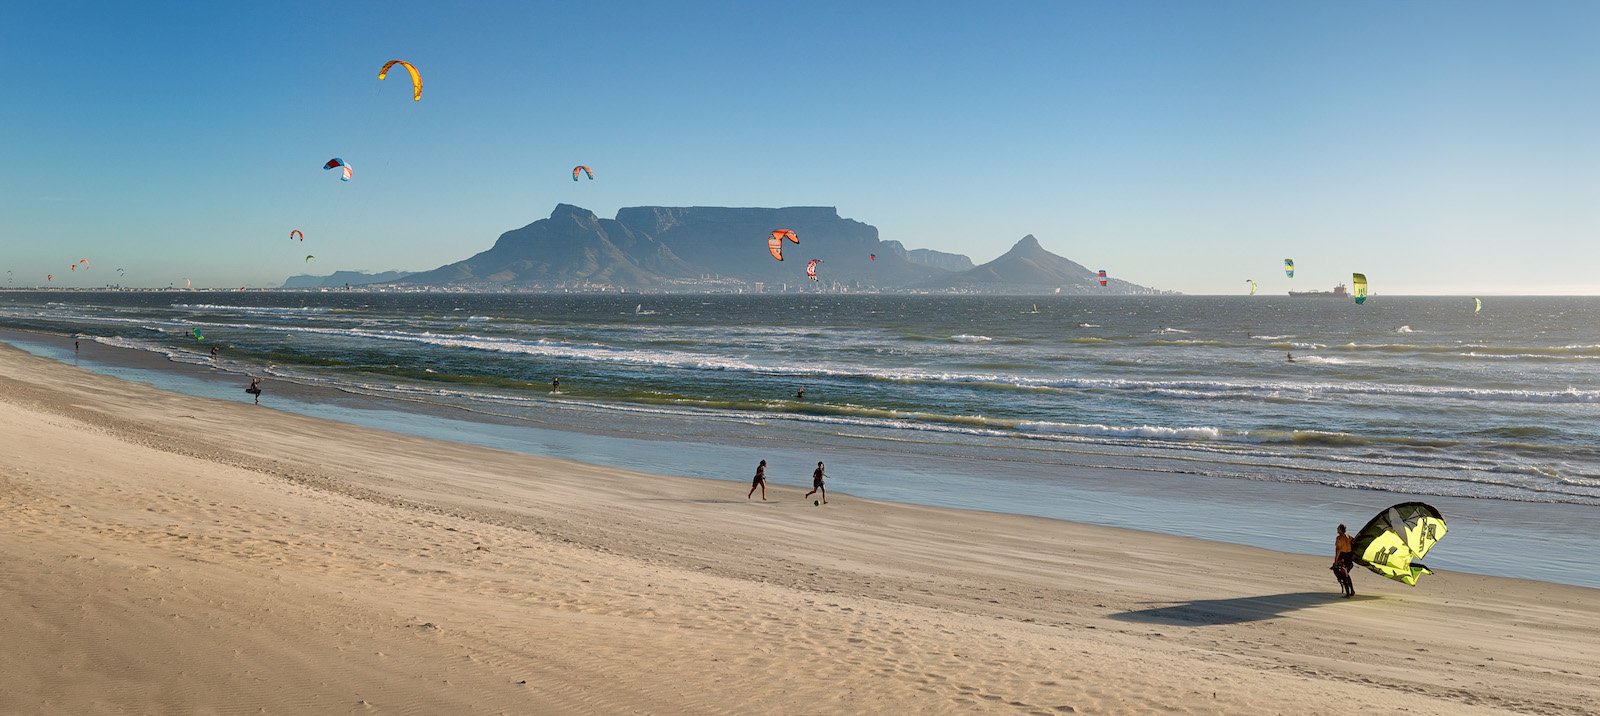
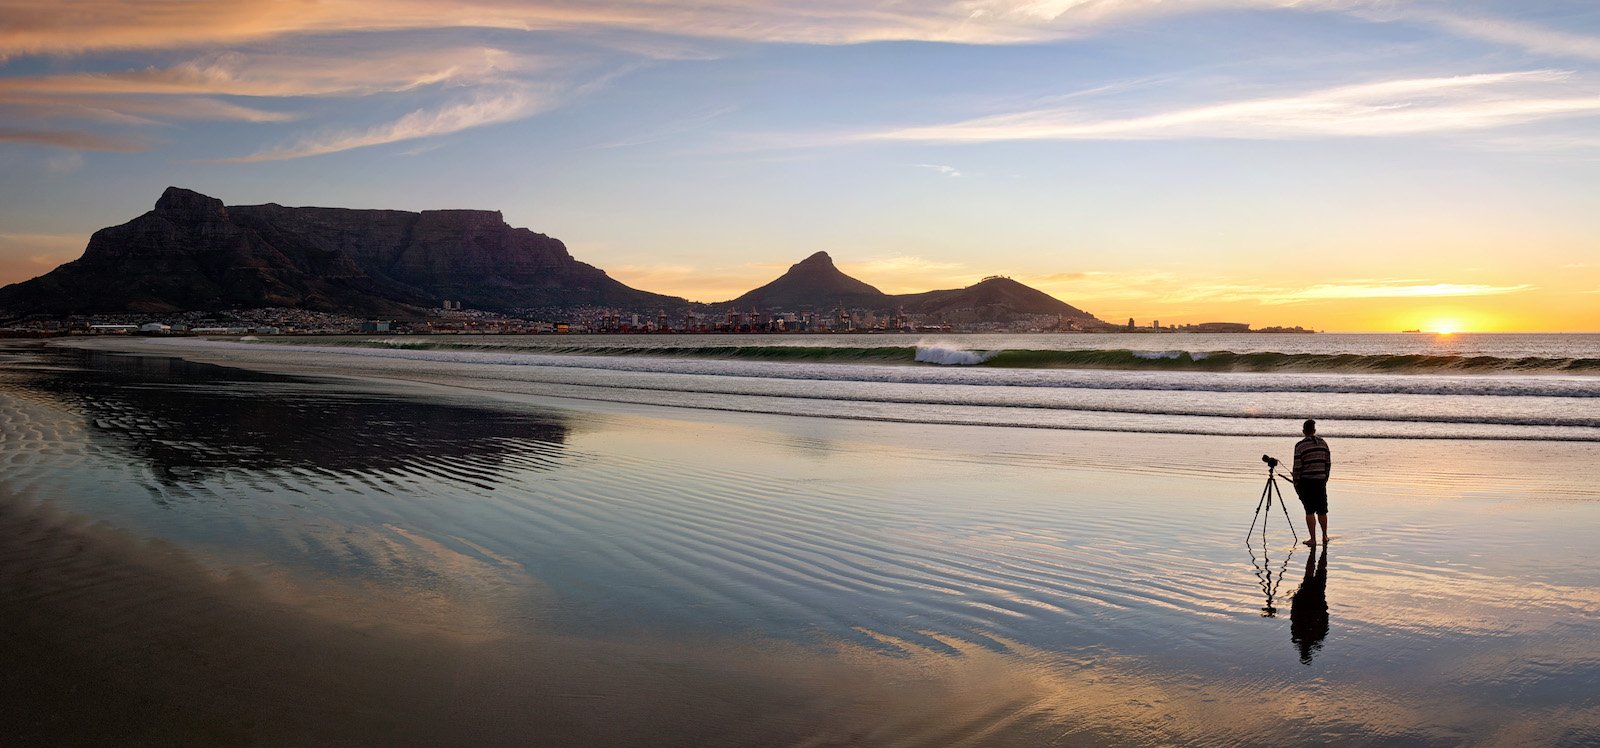
There is no better subject to test a multi-camera panoramic-rig on than a sky full of kite-surfers! There are at least 40 (fast) moving objects in the photo below… which my rig manage to capture perfectly… with not a single stitching- error to be found! Not a single kite-string was disjointed, every wave lined up perfectly, and the 35 mm focal length offers a completely natural perspective. Table Mountain looks exactly this big (relative to the people in the foreground) when you’re standing where I was standing while I was shooting the images for this panorama.
As our summer starts morphing into autumn, so we’re finally getting some nice weather again here in Cape Town. The wind is much less ferocious, the air is getting clearer, and the clouds are starting to fill the skies again at sunset.
Operating all the cameras at the same time is proving to be easier than I thought it would be. The horizontal nature of the “banana arrangement” lends itself to visually aligning the cameras with the horizon, so getting the horizon perfectly level is a whole lot easier with this rig than it is with a single camera.
The biggest headache so far has been keeping the lenses clean and dry (with plenty of flying sand and salt-water spray), but I have since discovered that it is a whole lot easier to just cover everything with a light blanket when I’m not shooting, than to keep popping all the lens-caps on and off.
At this stage I’m still playing it safe and allowing a 30–40% overlap between each of the images. I could probably get away with a 10-15% overlap with these 35 mm lenses, but I prefer my horizontal panoramas to have a (roughly) 2:1 aspect ratio. Plus… when you shoot too wide… the light tends to start getting confusing (when the shadows on the left of the photo are pointing in a completely different direction than the shadows on the right).
But even with the generous overlap that I have allowed, these panoramas are still roughly 15,000 pixels by 6,000 pixels in size. That works out to a whopping 90 megapixels in total… that’s medium-format territory… and not too bad for a couple of entry-level DSLR cameras!
Besides Table Mountain, there are a whole bunch of other subjects that I am now finally able to capture as high-resolution, freedom-of-lens-choice, multi-image panoramas. As soon as I am comfortable using the rig for day-time panoramas (when I can do everything with my eyes closed), I plan to start capturing panos of car-headlight-trails at twilight… and perhaps even some panoramic star-trails? Who knows what next? The possibilities are endless!
Finally, I feel totally free to capture any subject with my new multi-camera pano-rig, confident that the cameras and lenses will capture all the details, and that the stitching software will be able to put everything together afterwards!
About the author: Paul Bruins is a Cape Town based professional photographer who has spent the past 12 years exploring and photographing every corner of his home town and province. His images have won numerous competitions and awards, and have been published on calendars, in magazines, and as book covers. To see more of his work, visit his website or follow him on Flickr, Facebook, and 500px.


